
Released on September 15, 2025
Why Your Mobile Game Lags: 3D Asset Optimization in Blender
Stop shipping heavy models. This technical deep-dive reveals the essential Blender checklist for mobile performance, from automated decimation to advanced normal map baking.
Table of Contents#
- Introduction: Performance is a Feature, Not an Afterthought
- Step 1: The Polygon Diet - Every Vertex Counts
- Step 2: Master the Texture Atlas to Reduce Draw Calls
- Step 3: Baking Normals - High-Detail Illusions on a Low-Poly Budget
- Step 4: Smart Texturing - Size, Compression, and Power-of-Two
- Step 5: Clean Exports for a Lean Game
- Conclusion: Optimized Assets for a Smoother Gameplay Experience
Introduction: Performance is a Feature, Not an Afterthought #
Creating beautiful 3D models in Blender is one thing, but making them run smoothly on the wide, wild world of mobile devices is another challenge entirely. Mobile hardware has significant constraints on processing power, memory, and thermal output. A model that renders instantly on your desktop PC could easily cause a mobile game to stutter, overheat, or even crash.
This is where optimization comes in. It's not about making your models look worse; it's about making them look great efficiently. This guide will walk you through the essential optimization techniques inside Blender that will ensure your game is accessible and enjoyable for as many players as possible.
Step 1: The Polygon Diet - Every Vertex Counts #
The most fundamental optimization is reducing your model's polygon count. The fewer vertices and faces the GPU has to process, the faster your scene will render.
- Focus on the Silhouette: Ask yourself: does this polygon change the model's overall shape from a distance? If not, you might not need it. Be ruthless in removing edge loops that don't contribute to the silhouette.
- Use the Decimate Modifier: For background props or distant objects, Blender's
Decimatemodifier is a quick way to automatically reduce polygon count. It's great for a fast pass but can sometimes create messy geometry. - Manual Retopology for Heroes: For important assets like player characters or main props, manual retopology is the gold standard. This means building a new, clean, low-poly mesh over your detailed sculpt, giving you full control over the edge flow and polygon density.
Remember the goal: use the absolute minimum number of polygons required to define the object's shape.
Step 2: Master the Texture Atlas to Reduce Draw Calls #
A "draw call" is a command from the CPU to the GPU to draw something on the screen. Each material in your scene typically requires a separate draw call. On mobile, draw calls are a major performance bottleneck.
The solution is a Texture Atlas. This is a single, large texture sheet that contains the textures for multiple different objects.
- Combine UV Maps: In Blender, you can join multiple objects (
Ctrl + J) and then edit their UV maps to fit onto a single layout. - One Material to Rule Them All: By arranging the UVs of different models (e.g., a sword, a shield, and a helmet) onto the same texture space, you can apply a single material to all of them.
- Bake the Combined Textures: Bake the Albedo, Roughness, and other maps for all objects onto a new set of shared atlas textures.
Now, the game engine can render all of these objects in a single draw call, drastically improving performance.
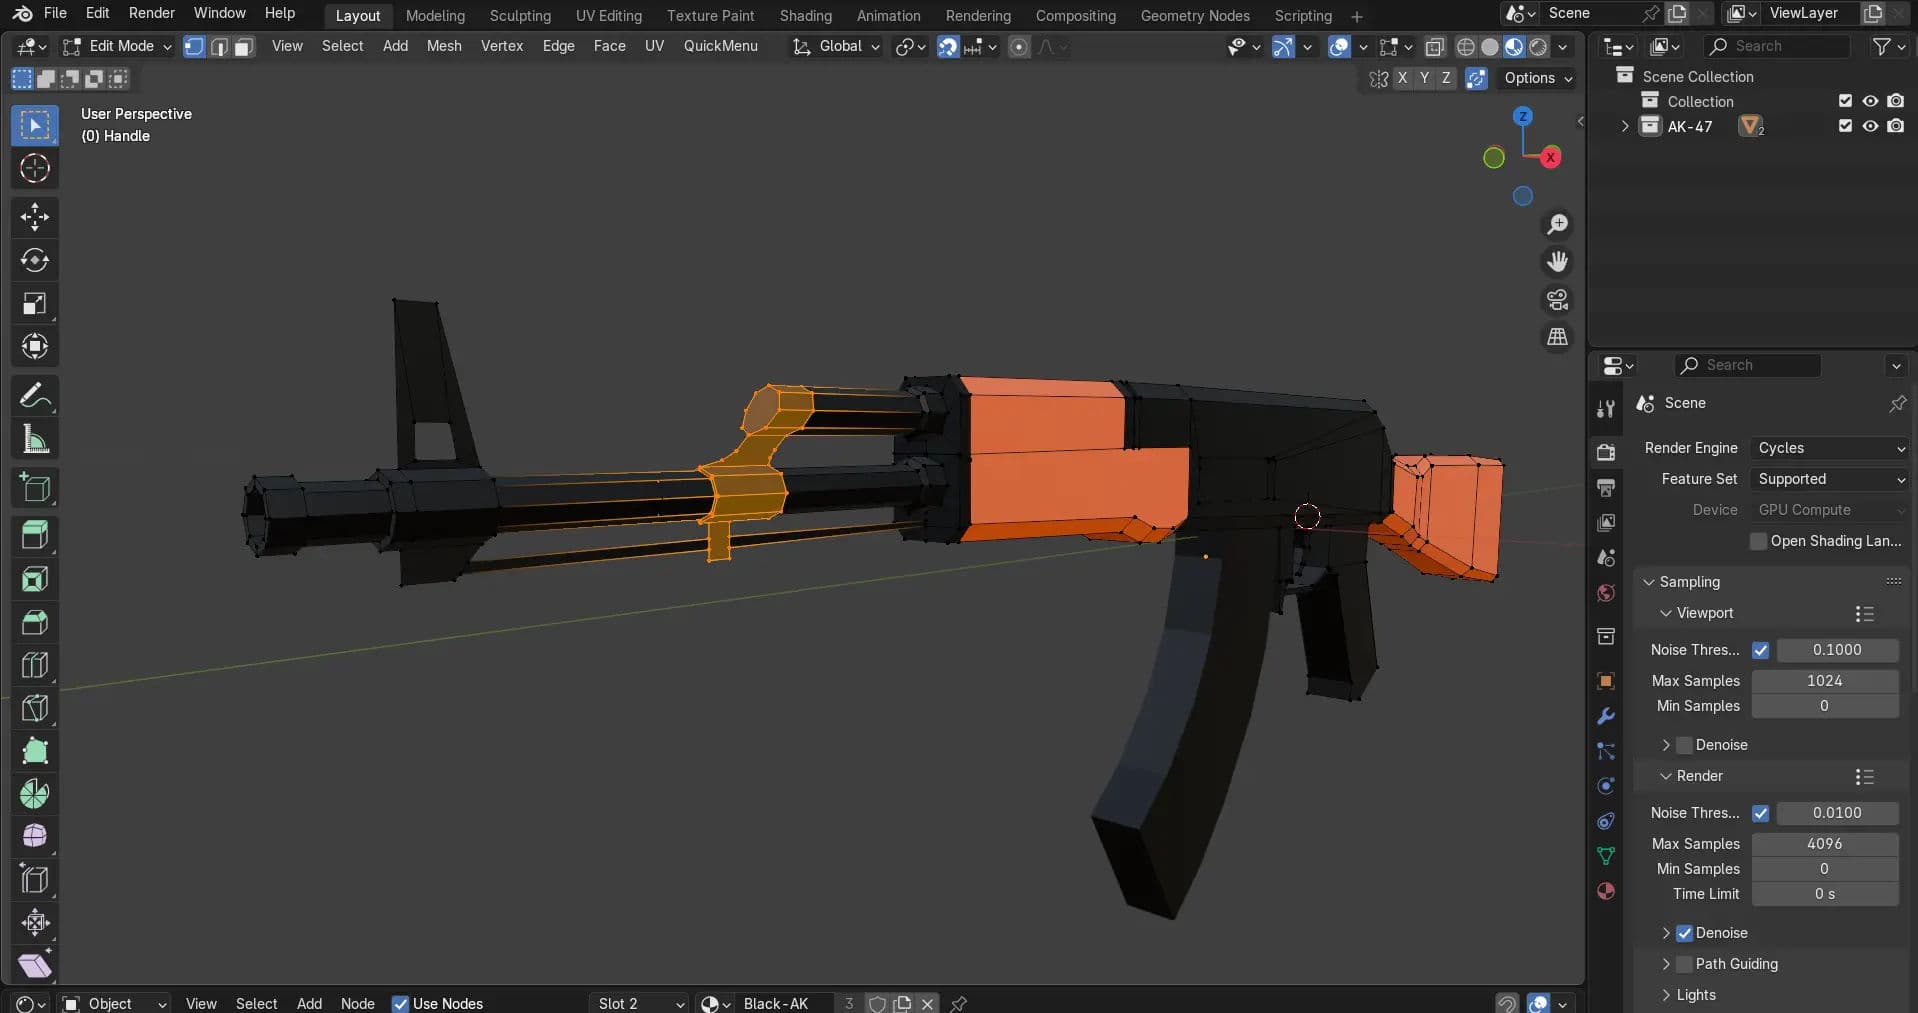
Step 3: Baking Normals - High-Detail Illusions on a Low-Poly Budget #
So you've reduced your model to a few hundred polygons, but now it looks flat and boring. How do you get the detail back? By baking a normal map.
A normal map is a special texture that tells the lighting engine how to shade the surface, faking the appearance of bumps, dents, screws, and other fine details without adding any actual geometry.
The workflow is simple:
- You need two versions of your model: a high-poly detailed version and your low-poly optimized version.
- Place the low-poly model directly over the high-poly model.
- In Blender's Cycles render engine, use the
Bakepanel. Select the high-poly, then shift-select the low-poly. - Set the
Bake TypetoNormaland checkSelected to Active. - Click Bake. Blender will project the surface details from the high-poly model onto the low-poly model's UV map.
This technique is the secret behind almost every modern 3D game, allowing for incredible detail on performance-friendly models.
Step 4: Smart Texturing - Size, Compression, and Power-of-Two #
Large textures consume a lot of VRAM (video memory), which is extremely limited on mobile devices.
- Use Powers of Two: Always make your texture dimensions a power of two (e.g., 256x256, 512x512, 1024x1024). This is critical for texture compression algorithms used by game engines. A 1025x1025 texture will use significantly more memory than a 1024x1024 one.
- Match Size to Importance: Don't use a 2K (2048x2048) texture for a tiny rock or a background object. A player character might justify a 1K or 2K texture, but smaller props can often use 512x512 or even smaller.
- Leverage Engine Compression: Game engines like Godot and Unity have built-in texture compression settings (like VRAM compression). This significantly reduces memory usage on the GPU. While this happens in the engine, starting with a reasonably sized source texture from Blender is the first and most important step.
Step 5: Clean Exports for a Lean Game #
When you're ready to export, use the glTF 2.0 format for the best compatibility with modern game engines. During export, make sure your settings are lean.
In Blender's glTF 2.0 export dialog:
- Apply Modifiers: Check this to ensure modifiers like
Decimateare permanently applied. - Include Only What You Need: Under the
Datatab, uncheck anything you aren't using, likeVertex Colorsif you haven't painted any. - Use Compression: If available, use the Draco mesh compression option to further reduce the file size of your model's geometry.
Every byte you save in the exported file is less data for the mobile device to load.
Conclusion: Optimized Assets for a Smoother Gameplay Experience #
Optimization is an art form that balances visual quality with performance. By following these core principles—maintaining a low polygon count, using texture atlases to minimize draw calls, faking detail with normal maps, and being mindful of texture sizes—you can create 3D assets in Blender that not only look fantastic but also perform brilliantly on a wide range of mobile devices.
A well-optimized game is a game that more people can play and enjoy. Happy optimizing!
Continue Reading
Fix Your Broken Blender to Godot Animation Exports: The 2026 Guide
Tired of messy tracks and broken rigs? Master the glTF 2.0 and NLA Editor pipeline to move characters from Blender to Godot 4 flawlessly, every single time.
From Blender to Godot: A Guide to UV Mapping for Perfect Gradients
Struggling to export gradient materials from Blender to Godot? This guide provides a step-by-step workflow using texture atlases and UV mapping to ensure your materials look perfect in-engine, while also optimizing performance.